Strip Cast Iron

There are many different methods of stripping old seasoning and rust from cast iron, here are a few that work for me


I have a multi-stage process. Which stages I actually use depends on the piece I am restoring.

Most of this section features processes that require some special equipment. If you are only going to be stripping one or two pieces you may want to skip to the end for some simpler methods that can be used with just a few supplies found in any grocery store.

Stage 1: Lye - For heavily seasoned cast iron

DIY: Build a Lye Bath
Note: Caution must be taken when working with lye. Wear heavy duty, long cuffed chemical resistant gloves, eye protection, and avoid any exposed skin on your arms and legs. Learn More about how to safely work with lye.
  1. Carefully place cast iron in lye bath
  2. Wait at least 1 day
  3. Carefully remove from lye bath and transfer to bucket or plastic tote
  4. Use a nylon scraper to gently remove thick clumps of dissolved seasoning
  5. Transfer to sink or outdoor area* to be rinsed
    *Lye will kill plants, be careful where you rinse your cast iron outdoors
  6. Rinse well with cold water while scrubbing with steel wool and/or handheld stainless steel brush
  7. Repeat steps 1-6 as necessary
  8. Cast iron can be left in the lye bath pretty much indefinitely. If something you are restoring has some really stubborn seasoning and you aren't in a hurry to finish it don't be afraid to leave it for weeks or even months.

Stage 2: Carbon Off - For stubborn carbon deposits unaffected by lye

Like lye, Carbon Off can and will cause damage if it comes in contact with your skin. Use similar precautions when handling Carbon Off, and make sure to read the entire label before use. Only use Carbon Off in a Well Ventilated Area!
  1. In a well ventilated area apply a small amount of Carbon Off gel to affected areas with a paper towel or paint brush
  2. Lightly cover with aluminum foil
  3. Wait a minimum of 30 minutes, maximum of 24 hours
  4. Remove tin foil and scrub affected area with a handheld stainless steel brush (do no over scrub. if the deposits are not coming off easily repeat steps 1-3)
  5. Rinse thoroughly with cold water

Stage 3: Electrolysis - For rust and light seasoning

DIY: Build an Electrolysis Tank
For pieces with ONLY rust and no seasoning or carbon to remove you can go straight to this step. For pieces with NO rust you can skip this step. Electrolysis will remove light seasoning but I find it is much more efficient to remove heavy seasoning with lye before putting in the tank.
  1. Using bare steel wire (I use rebar tie wire) wrap a few times through the handle
  2. Hang the cast iron inside the electrolysis tank while making sure it is not contacting any of the anodes
  3. Attach the negative lead to the wire attached to the cast iron
  4. Attach the positive lead to your anode(s)
  5. Turn on your power supply and check the amperage readining. You will likely see lower amperage than the charger is rated/set for but that is normal. After a few moments the cast iron should start vigorously bubbling in the water, this means it is working. If the water is completely still something is wrong.
  6. Depending on the amount of rust, the ize and position of your anodes, and the amperage rating of your power supply, this process may take as little as an hour or as long as a day (or more). Check your progress from time to time, you can remove your cast iron once the rust is either no longer visible or has turned entirely black. Note: Be sure your power supply is turned off while checking your progress
  7. Once all signs of red/brown rust are gone remove the cast iron from the tank
  8. Transfer your cast iron to sink
  9. Using a steel wire brush and/or steel wool clean off any remaining residue. During the electrolyis process the rust on your piece may turn black and remain stuck, however it should come off relatively easily. If you are having trouble removing this black residue it may need more time in the tank

Stage 4: Final Cleaning

  1. Rinse any loose debris and residue off your cast iron
  2. Use grade 1 steel wool on all surfaces to remove any remaining stuck on residue
  3. Add dish soap while continuing to scrub
  4. Rinse thoroughly with cold water
  5. Use paper towels to wipe dry
  6. If the paper towels are becoming noticeably dirty continue to rinse and scrub with soap and a nylon brush
  7. If it still refuses to come clean try using a Magic Eraser while rinsing frequently
  8. Once clean and towel dried place in a 350 degree oven for 15 minutes to dry completely

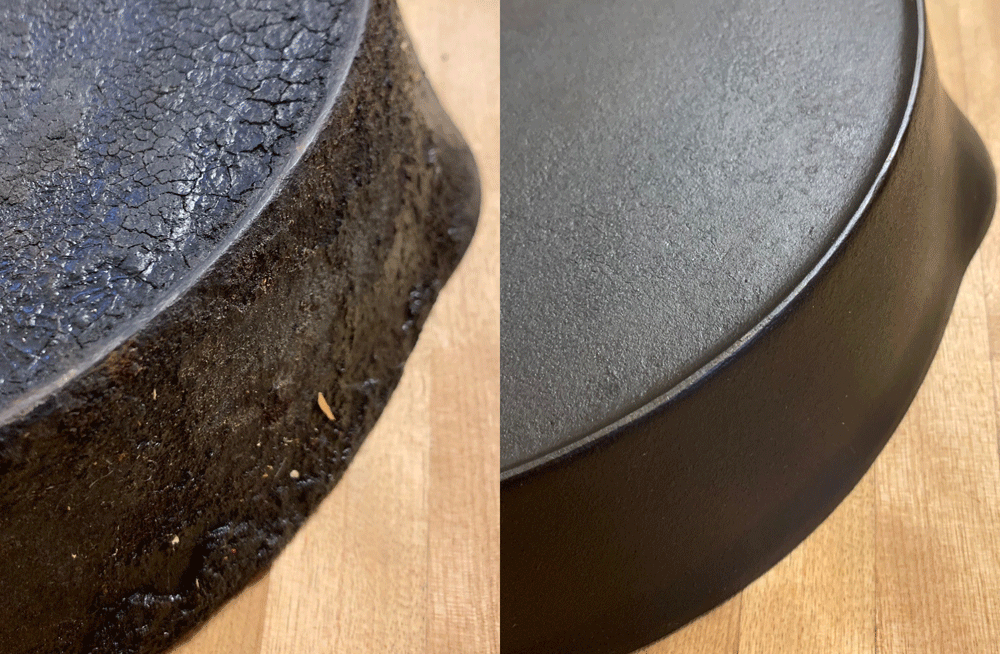
You are now ready to season!


Other Methods:

Removing Seasoning

The Easy Off Method:
Warning: The active ingredient in Easy Off is lye. Follow the instructions on the can carefully and take proper precautions to avoid contact with skin.
Supplies Steps:
  1. In a well ventilated area coat your cast iron in a thick layer of Easy Off. If you do this outdoors be mindful of the direction of the wind, you do not want a face full of Easy Off!
  2. Place soaked cast iron in a heavy duty garbage bag and seal up tight
  3. Store in a warm place for at least one day
  4. Remove from garbage bag and scrub with steel wool and/or a steel brush
  5. Rinse completely
  6. Repeat as necessary

Removing Rust

The Vinegar Method:
Supplies:
  • Distilled white vinegar
  • Water
  • A container large enough to completely submerge your cast iron
  • Steel wool
  • Steel brush
Steps:
  1. Fill your container with a 50/50 mix of distilled white vinegar and water. Make sure there is enough to completely cover your cast iron.
  2. Place your cast iron in the vinegar solution for no more than 30 minutes
  3. Remove from the vinegar solution and scrub with steel wool and/or a steel brush
  4. Repeat steps 2-3 as necessary
  5. Warning: Do not leave cast iron in vinegar for longer than 30 minutes at a time. Vinegar will soften and dissolve cast iron if left too long.

Bad Ideas

Some ways NOT to strip your cast iron:
  • Power Tools. You may permanently damage the surface of your cast iron. It isn't worth the risk
  • Fire / Hot Coals. Fire damage is the bane of cast iron collectors. A fire damaged piece will be weaker and may never season well again. Fire damaged pieces often have a reddish hue. It may look similar to rust but a deeper shade of pink or red.
  • Self Cleaning Oven. This has similar risks to using fire, not to mention it puts excessive strain on your oven.

This site occasionally uses Amazon.com affiliate links to share products. Not all shared products have been used or are recommended, many are simply examples of the type of product required for a specific task. Always do your own research before making a purchase online.

Always use caution when working with heat, electricity, or chemicals. Follow any of the guides on this website at your own risk.